
Today, In this post I will be writing about how you can unpack a UPX packed file. Well, there are several posts related to it online but I have noticed everyone is following just the same steps without giving much insights into the background working.
Since my blog is dedicated to the absolute beginners, I’ll try to go in as much deep as I can in this article so that you don’t feel yourself like a blank cartridge.
So, I’ll try to explain basically by dissecting each and every step of the unpacking process of a UPX packed file.
So, what’s the agenda?
First of all, we will understand what a packer is and will talk about a well known open source packer – UPX. We will pack the file first and later we will see how we can go ahead and unpack the same file that is packed with UPX packer.
Here we will also see both ways to unpack a file – automatic or simple as well as the manual way of unpacking a UPX packed file.
And if I tell you, manually unpacking an executable file is where the actual fun begins.
What Are Packers
Software packers are a way of compressing an executable and combining the compressed data with the decompression code (unpacking stub) into a single executable.
So, when the packed executable is first executed, the unpacking stub unpacks and recreates the original code from the compressed code before executing it.
Malware authors mainly use these type of packers to hide the presence of malware from antivirus scanners and also to make the analysts task difficult of reverse-engineering the packed file
What is UPX?
UPX (Universal Packer for Executables) is one such open source, free and easy to use software packer available today on the Internet and mostly used by malware authors to compress their malware so that it can bypass detection by antivirus signatures.
UPX supports all major operating systems and both x86 and x64 platforms and also supports a variety of file formats. UPX compresses the executable and is designed for performance rather than security.
UPX is not difficult to reverse-engineer and it does not pose much of a challenge for a malware analyst or a reverse-engineer. Most programs packed with UPX can be easily unpacked and requires a simple command line option “-d” to unpack a UPX packed file.
Since unpacking with UPX is fairly easy, it is a good packer for learning how to manually unpack a UPX-packed executable which we will be seeing later in this post and is actually the main agenda of writing this article.
Let’s Get Down To The Unpacking Business
Here we will demonstrate the unpacking of a UPX-packed executable file in two ways. First, we will try the easiest way and will see how easy it is to unpack the packed executable and secondly we then will see how we can actually decompress the UPX packed file manually.
For demonstration purpose, I will be using a program called “BinText”, one of the Malware Analysis tools for extracting strings from any specimen.
I have provided the link of the sample here so that it becomes easier for you to follow along. Before we actually start delving into the world of unpacking we need few tools to have it in our arsenal.
And just to save some time from Googling, I have provided the link to all the tools I have used here in this article.
- UPX packer
- Packer detectors like PEID, ExeInfo PE or RDG Packer Detector
- OllyDbg
- OllyDumpEx plugin
- Scylla
I highly urge you to perform any kind of analysis or reverse-engineering on an isolated machine. Having followed this step will save you an extra time in fixing up your messed up machine.
If we simply drag the program “BinText” to our Exeinfo PE program it detects as being compiled by Microsoft Visual C++ and also detects as not packed.

Now if we take that same program and run a UPX packer on it. Let’s see what results we get. To first pack a program, follow the command below:
upx.exe -9 bintext.exe -o bintext_packed.exe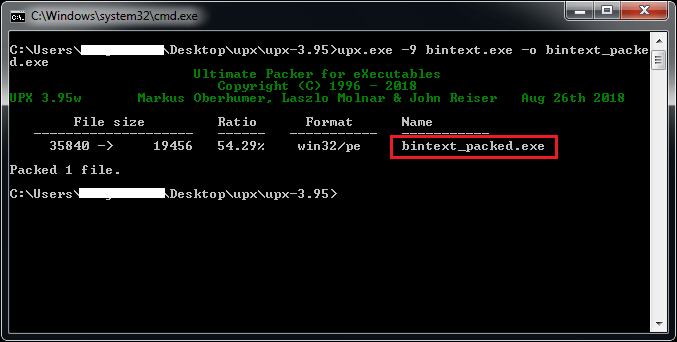
UPX offers different compression levels from -1 to -9 and, –best which offers the best compression but may take long time. In our scenario, we have used compression level -9 as it favors compression ratio over speed. The option -o is used for the name you want to give it to your packed file.
If you clearly see in the image above, the size of the file has been reduced to its half after compressing it and a new file is saved in the name of bintext_packed.exe which is our UPX packed file. Let’s verify that.
Open Exeinfo PE again and drag the newly file outputted from UPX and check the results. Here, check mine below:
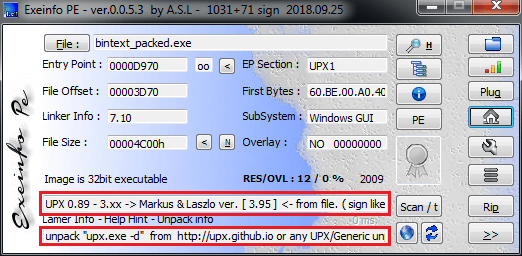
Now it is showing as our program is UPX packed and if you notice just below that, Exeinfo PE has also provided a way on how we can unpack the same executable file.
Since UPX is a well-known packer and because of its signature is developed by many security solutions and detection tools, packer detectors like Exeinfo PE can determine the file as UPX packed.
However, if it would be a custom packer then you will find some hard time identifying the packer and unpacking it. Identifying a custom packer is more difficult and time-consuming. But let’s focus on the simple one for now.
Another way to verify whether the program is packed is to open up the program in OllyDbg and check for the imports section. Hit Ctrl+N to open up the imports window. If it is packed, the program would be having lesser or few imports which is actually the case here.

So, this is the file “bintext_packed.exe” which we will be unpacking it. First, let’s see how we can do it the easiest way.
To unpack it open up your command prompt and type in the below command:
upx.exe -d bintext_packed.exe -o bintext_unpacked.exeNow we will be unpacking the same file but manually. So, go ahead and launch the UPX packed file in program “OllyDbg”. And soon after opening the file, OllyDbg stops at an instruction “PUSHAD” which is currently an entry point of our packed executable file.
PUSHAD will push all the 32-bit registers onto the stack and are commonly used with POPAD instruction. So, we will be seeing Ollydbg hitting POPAD instruction later somewhere in the execution process.

Next, we have to take one step ahead from that instruction by stepping into or stepping over the PUSHAD instruction. All you have to do is to hit the key F7 or F8. Once done EIP (Instruction Pointer) will point to that instruction that follows PUSHAD.
Instruction Pointer is a register that actually contains the address of the next instruction to be executed.

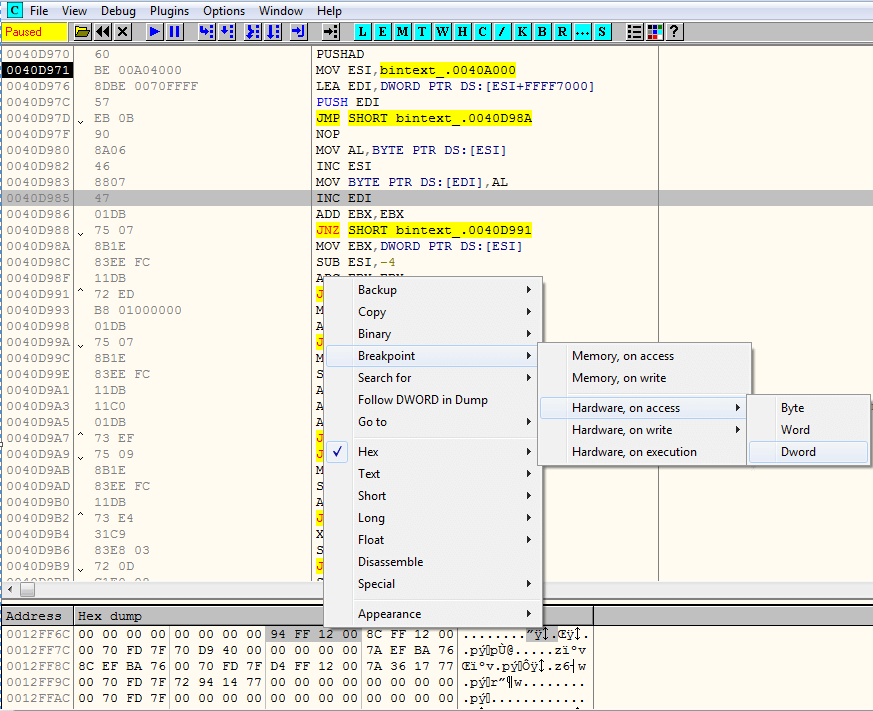
Then we have to right click on the ESP register in the registers panel on the right and click on Follow in Dump. This will dump the contents of the register into the memory.

In the memory dump window of OllyDbg below, select the first 4 bytes and set a hardware access breakpoint on Dword. This will break at the instruction right before we unpack the executable.
Proceed by hitting the F9 key or Run button and the execution will stop at the hardware break point we set earlier i.e. the instruction following the POPAD at address 0040DAE6. The POPAD instruction pops up or restores all the registers from the stack.

Just a few instructions below the VA at 0040DAE6, you would see a jump (JMP) instruction. That jump instruction is actually a tail jump and is responsible for transferring the execution to the Original Entry Point (OEP).
So, here in our case at the instruction JMP bintext_.0040422D, JMP instruction is transferring execution to the OEP at VA 0040422D.
How To Identify The Tail Jump?
There are two features that will clearly indicate that the particular instruction is
- It is located at the end of the code, and it links to an address that is very far away.
- Normally jumps are used for conditional statements and loops and go to addresses that are within a few hundred bytes, but if a jump that goes to an address that’s tens of thousands of bytes away.
Clearly identify that it’s a tail jump.
Now, put a breakpoint by hitting F2 on the tail jump. And hit Run or F9 so that the execution stops at the JMP instruction.

Here, we see some instructions just after the tail jump. These instructions look nonsensical. Actually, the tail jump is the last valid instruction before a bunch of bytes that are invalid instructions. These bytes are padding to ensure that the section is properly byte-aligned.

Once you hit F8 or Step Over button the execution from tail jump will move to the Original Entry Point. Here, we reached to the instruction at address 0040422D.

Our packed executable has been unpacked into the memory but before that executable could work again, we need one more thing to do – Build the Import Address Table (IAT) so that the executable can load all the functions it requires while launching it.
Read More: Exciting Journey Towards an Import Address Table (IAT) of an Executable File
Now, we will begin with the process of rebuilding the IAT. Navigate to the Plugins Tab and select OllyDumpEx and Dump the process.

This will open up the OllyDumpEx window and Click on Get IP as OEP and then finally dump the process. Make sure you double check your OEP before dumping the process. In our case, it was 0040422D, where the tail jump throws to the next instruction after pressing F8 key. OllydumpEx will automatically append “dump” keyword to the new file while saving it.

Now open up Scylla and attach an active process to it. Here, we’re talking about an executable that we earlier packed with UPX and not the one that we recently dumped.
Now click on “IAT Autosearch” so that it can automatically find the Import Address Table (IAT) of the executable. After that click on “Get Imports” to get a list of imports that the executable already has.

Now the only thing left is to fix the dump of our executable. But before that, the last step left out is to change the OEP field here. See the text box in front of “IAT Autosearch”.
Remember the OEP of your program? It is the one which you set earlier in OllyDumpEx plugin. Both the OEP should be the same.
Once done click on “Fix Dump” and select the file that we dumped earlier. Scylla will now save the file with the “_SCY” keyword appended to the file.

Check below Scylla logs for your reference. The file “bintext_packed_dump_SCY.exe” is now your fully unpacked executable file.

Let’s verify whether we successfully unpacked the file or not. Open up the new executable file in OllyDbg and check whether the execution of the program breaks at the OEP you set.

Also, hit the key Ctrl+N to open up the Imports table and check whether you have more imports than earlier. Here, we are having hundreds of imports which was very few earlier when it was packed.

And our unpacked program works totally fine after launching.

Happy Unpacking 🙂
1 comment
Thanks for your post and explanations, Satyajit!
Remember to always check into the section to validate the IAT address and length for Scylla…
In cases, you can miss some APIs. Here, the IAT starts at 405000h and is 220h length,
adding a missing API: va=”5D0A1FF8″ iat_rva=”00005000″ name=”ImageList_AddMasked”.
Greetings.